Wednesday, February 2, 2011

Memories that last a lifetime.

As most everyone knows the midwest has been in the middle of a "snowapalooza." This resulted in my having to walk and get the mail.(it is quite a long drive BTW) This isn't such a bad thing considering I have been home for the past two days doing nothing but cooking and keeping the recliner warm.
On my way to the mailbox a truck passed by pulling a very large sled behind it. In an instant I was jolted back in time 30+ years to my childhood.
I grew up on a dairy farm. Growing up there were many chores that annoyed me, strict parents who I thought had never been children before and little brothers who I believed were put on this earth to annoy me. However now that I am grown and of course smarter I realize that I am probably a more well rounded adult because of the farm.
Now back to the memory jolt. When I was growing up my dad was the ultimate dad. He played harder than all of us kids. Thus when it came to sledding, we had the BEST SLED. It was a huge hand built wood sled that he pulled behind the tractor. When I say huge, I mean it was big enough that we would ride around the community (and I'm talking the country here...miles between houses not blocks) and pick up all the neighborhood kids. It was great! We did that every winter there was a snow deep enough for dad to get out the big sled. It was dangerous by today's standards, but come on...IT WAS "REAL" FUN! The get outside, no t.v. or hand held games kind of fun.
Who has fun like that today?
Well apparently someone has not forgotten how to have real fun as I watched them get pulled down the road. This time it wasn't a tractor, but a truck with a big sled and lots of kids whooping it up. I had not thought of that kind of sledding in a long time until today.
Then on my way back up the drive I thought of something else:
Snow Ice Cream!!!!
That's right, you heard me, Snow Ice Cream!!!
Let me say now if you are against imitation flavors and bad for you processed sugar, stop reading now. If you keep reading you will probably just have the urge to send me a note about how this is just a ridiculous idea. You would probably be right because this is nothing but milk, sugar and imitation flavoring. BUT It's just a once in a year kind of thing. And the world might be a kinder place if we all played through our inner child more often.
So if you're into stupid, crazy ideas...then come on lets go.
Your kids will enjoy it and they'll eventually come off their high! You'll be the talk of the block.
All you need is an enormous bowl. I used the large white one from Tupperware. I have no idea how big it is. Just that it's big. 

Fill it with CLEAN snow. ~Insert all yellow snow jokes here.~

The rest of these measurements are with that size bowl. If you're using a smaller one adjust your measurements accordingly.

Add 3 C milk, 2/3 C sugar, and 2 tsp flavoring of your choice. Because I was feeling frisky, I used coconut flavoring!

Stir until it all comes together. EAT FAST!
I hope all of you are making your own snow memories. Thanks for letting me share some of my memories.

Tuesday, February 1, 2011

Savory SNOW Day!


I sit here watching the snow fall outside or can I say blowing sideways. (Sure glad there are no orders today, not wanting to go to the bake shack) Because of the blizzard warning here in the Missouri ozarks and the now growing winter wonderland outside I can for the moment forget my "real job" and spend a few hours playing around in the kitchen. I hope to create many baked masterpieces...and get a surplus of future blog pictures while I'm at it.
Might as well "kill two birds with one stone" right?
Author's Note: There were no birds killed in the making of this blog, in fact there was feeding of the birds. Just my feeble attempt at blog humor.

First on my list: A savory warm breakfast to start the day. I am totally a savory girl. Rich breads. Warm crackers. Cheesy scones. I'm all over the savory side of life. 
My thighs will definitely attest to this.
I digress....
Back to the mouthwatering, dream like savory bread I was talking about. I like baking and eating bread, but I'm a little impatient and tend to gravitate toward quick breads. Which basically means breads that don't use yeast. I guess I'm not very good at delayed gratification. :) Because of this little bad habit of mine I needed something quick this morning. The decision this morning was easy. 
Scones. 
Snow Scones 
(HA! Ok so some of my humor attempts may only be for pure self pleasure)
 
Scones! 
Breakfast scones!
Perfect snow day scones!
That's right a blend of crispy and guilty pleasure mixed with the subtle hints of sausage and cheese. You know you want some. Go ahead, go pull that sausage out of the freezer and let it thaw. You will succumb to these delectable treats.

 Sausage and cheese scones adapted from Midwest-Living.com
  • 1  12-ounce package sausage cooked and drained ( I used HOT)
  • 3-1/4  cups all-purpose flour
  • 1/2  cup sugar
  • 2-1/2  teaspoons baking powder
  • 3/4  cup butter
  • 1-1/2  cups shredded cheese ( I used Colby/Jack)
  • 3/4  cup buttermilk
  • 1 beaten egg with dash of cream for egg wash
Oven 400` 
Baking Stone (or other baking sheet)
 
In stand mixer mixing bowl, stir together flour, sugar, and baking powder. With your paddle attachment cut in butter until mixture resembles coarse crumbs. About 2 TBL at a time. Stir in cheese and sausage. Make a well in the center of the dry mixture; add buttermilk all at once. Using a fork, stir until just moistened.It's best to work your way around the well, slowly pushing dry into wet.  
 
Turn dough out onto a lightly floured surface. Knead about 20 strokes or until dough is nearly smooth. Pat half the dough into 3/4-inch-thick circle. (Mine was a bit thicker) Cut circle into pie slice wedges. Place scones 1 inch apart on baking.Brush with egg wash if you desire for golden tops.

Bake for 12 to 15 minutes or until golden. Cool on a wire rack 5 minutes. Serve warm.
All you creative professional photographers, please don't just my feeble attempt!

Now all of you know I don't like to follow the rules. I did however with these follow most of the basic recipe. I do have a little review with changes I would make for next time.
*Next time this is what I would do: I would cut down the sugar, maybe in 1/2. Just a personal taste, they were a little too sweet. I was going for savory.
*I also would do a 1/2 and 1/2 whole wheat flour and AP flour combo. I don't like to add whole wheat flour to a recipe until I see how it does in the original form. Then I know how to play with the wheat flour. I believe this one is a good one for substitutions. If you try it let me know how it goes.

I hope any of you in the path of this "snowapolooza" get some quality kitchen time. Be safe and travel wisely.

Saturday, January 29, 2011

Camo is the new color!

Has anyone else noticed all of the camouflage out there these days? It's everywhere. On baby clothes, bedding, party favors. You name it, it probably comes in a camo color choice. With this recent awareness of the world around me I tried it out in a Valentine's Day cookie.


I really like, no I really love these cookies. After playing around with a few, I got another idea.

A bucket!
I picked a few of these up when they were deeply discounted, thinking I might have a purpose for it someday.
Guess What? Purpose Time

Now I present to you...

"The Bucket of Love" 

What man would not want a little "manly" love like this? I tell you any man would want a bucket of love for his V day present. Ladies, give your man some manly love this season and keep the last fashion trend in mind!

Tuesday, January 25, 2011

Rebel WITH a Cause

When it comes to the kitchen and recipes, I rarely follow the rules. So to anyone who hasn't yet picked up a wooden spoon or spatula, for fear of doing it wrong. Don't worry you CAN break the rules.

If I'm baking, ok who am I kidding, really never do I measure exactly (go ahead give me a big sigh and shake your head.) I never worry if I have ALL the ingredients as I tend to substitute anyway. Sometimes I mix the dry and wet all at one time instead of alternating (usually doesn't mess it up!). You get the picture right. I tend to walk to the beat of a different kitchen drum and I think most of the time, it all turns out ok!

This past weekend I needed an accessory for our roast dinner. I had an afternoon that was quiet, so I spent the day reading cooking blogs looking for something new. A secret pleasure of mine! As always, while on the web, I found the perfect complement to our dinner. Cheddar Black Pepper Biscuits from Joy the baker .


You guessed it, I didn't follow the rules and substituted ingredients and I didn't use a biscuit cutter! Mostly because I didn't have sharp cheddar on hand and I rarely use shortening so didn't have that either. However this recipe does call for cream of tarter which I know big S will be happy to see me using. (It is the one spice that I seem to have umpteen jars of)
BTW - Does anyone else have 10 jars that random spice?
How does this happen? 
I blame my collection of cream of tarter on the home-made play dough days.  
Anyway, I digress...back to biscuits

The big S had been watching football afternoon so after I rolled out the dough and went to grab the biscuit cutter I remembered the collection of football cookie cutters I just got and had yet to use. You guessed it...I decided helmet shaped biscuits would be fun. :) I know only us women can understand the goofy stuff...big S just said mmmm, they also look like brains or pork chops.
REALLY???? brains? oh well, I love him anyway.


Here they are:
adapted from Joy the baker:
2 cups all purpose flour
1 cup whole wheat flour
2 TBS sugar
4 1/2 tsp baking powder
3/4 tsp cream of tarter
3/4 tsp salt
12 TBS butter (1 1/2 sticks) cut in small squares
1 egg
3/4 cup buttermilk + 1 TBS
1/2 cup shredded colby jack
1/2 cup parmesan cheese
1/2 tsp fresh ground black pepper
black pepper and dash of cream for the tops

This recipe is simple and gets big pay out in the flavor department.
Pre-heat oven 425`. Mix all dry ingredients in mixing bowl. With the paddle attachment cut the butter into dry ingredients. This just means put in the butter and let the mixer beat until you have a crumb mixture. Add the cheese and black pepper and mix until well blended. Whisk buttermilk with egg and pour into dough. Use he dough hook attachment to knead the dough about 2 minutes. You may need a dash more milk because of the added cheese. Turn the soft dough ball out onto a floured surface and roll until its about 1 inch thick.
Use a biscuit cutter or like me, a cookie cutter to cut your biscuits.
  Brush tops with cream and black pepper. Put on ungreased baking sheet and bake 12-15 minutes.

These biscuits are sooo easy, they make the kitchen smell scrumptious and add the right amount of carbiliciousness to any meal. They bake up beautifully and would definitely impress anyone you have over for dinner.

Next time I will probably try all parm or maybe even romano. I think the extra sharp bite will meld with the bite of the black pepper. I could just use sharp cheddar, but that would be like following the rules, Right?

So go ahead, try some baking. I have faith in you and don't worry....breaking the rules is perfectly acceptable.

Sunday, January 23, 2011

Trial and Error

How do most of our greatest inventions happen? With great minds of course, but also quite by accident or pure trial and error. So with that in mind I took a different approach to a cookie recently. It was for a baby shower and the request for a monogram. I had given monograms a go before and the result was eh...ok. It pleased the customer and received oohs and awws, but I was disappointed in the result.

With that in mind, this cookie was going to get a different approach. Insert superhero dantadah music here.

My first attempt was using royal icing. (You know the cookie that was only eh..ok.) R.I.is the medium I normally use to decorate. I knew it had the "firmness and strength" needed for the cookie but wasn't sure on looks.
I tried to make "monogram O's" out of royal icing on wax paper. However I had trouble transferring the O's to the cookie without a lot of breakage. And because I get enough stress from my "real" job, the cookie business needs to be a stress free zone. Thus, I tried two different techniques. One being wet on wet (green cookie), it was probably the best of the two. I had to do something different with the onesie shape because the yellow was dry. So I tried just scripting the O. Both of these did get the job done but I wasn't happy with it. 
Since those cookies I'd moved onto other shapes and designs until a week ago when I got a call for a baby shower and guess what: Monograms! EEEK.
Secretly I was thinking oh can I talk them into something different, but knowing that I need to keep "the customer is always right" in mind I stayed positive.
Needless to say the brain went on overload and I began to think what else could I do? I do tend to do things the hard way most days, and I was pretty sure other cookiers out there had already mastered this, but for me I had to learn by doing and thinking it through. This was a growing moment. With great hope I decided to try melting chocolate wafers. It was taking a risk as I didn't really have a back up plan and had a short time to get them done...but here is the result.


Let me start with yes this pleased me. I was very happy with the overall "look." I do have to say though that these M's did not have the durability I was looking for. There was some breakage while trying to fix the platter, but with a soft touch they melted back together.

This was an awww ha moment as Oprah would say. I'm pretty sure I will keep this strategy the next time I need monograms and may even try almond bark because it might have the strength that the baking chips didn't.

So back to the title: some of our best creations come from trial and error. Happy Baking and if you don't succeed the first time....eat the cookie and try again another day!

Wednesday, January 19, 2011

Don't drink the water!

The past few months have been full of baby showers. So don't drink the water around here! Don't get me wrong, I like the business but eventually we must have some bachelorette parties, bridal showers and weddings to start the baby business all over again. There have been lots of baby mamas and lots of baby cookies. I didn't know how to share them, so I just decided I'd pick a few of my favorites.

Classic, simple, elegant.
Classic carriages, I love this baby shape

Now for a little theme: This shower was for a couple adopting two babies; a boy and a girl. I'm so proud for them and hope the adjustment goes well.
These baby animals were toppers for the cupcakes.
It was fun to do a pink and blue color scheme for one shower.
 And finally....the little buckaroo.

It seems I have a favorite until I make the next cookie and it moves into top spot. I love these bandanas!

  So many designs, not enough events. Lets have some love connections people. I want to make cookies for a wedding! :)

Monday, January 17, 2011

Creativity!....Easy as 1, 2, 3

Recently I declared that I'm really not that creative. I know it seems like a sham considering I bake custom cookies and all, but I don't feel like I am. So in order to not be faking it anymore, I'm ramping up my creative ways and bringing you along.

It's really rather simple and if I can do it, so can you. (I know it's an overused cliche'.)

Start with something simple - mine?  
Rice krispie treats


Now look at that basic idea and think how can I change it up.

Marshmallows and rice krispies....two rather simple ingredients but with a few quick changes you can take the normal basic rice krispie treats to a new level. 

Watch!

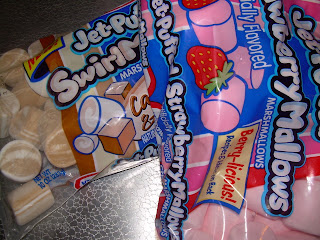
1. Take out the regular white marshmallows and use a festive color/flavor.


2. Instead of basic, bland, pan squares, dust off a cookie cutter. (dusting one off isn't my problem, it's choosing ONE shape)


3. Add something you wouldn't normally think of doing. In my case it was chocolate drizzle.


And presto 1, 2, 3!


As I said, creativity is easy as 1, 2, 3. I'd love to hear about your "bland and basic" change up. So leave me a comment.